So I’ve taken on board all the advice that everyone here was kind enough to give me after my recent post, re-read the manual (and paid proper attention this time) and done some practicing and there has been a definite improvement in the quality of my shots so thank you all.
I’ve got some further questions though if you would all indulge me a little more…I was up at Lakenheath again yesterday and the weather conditions were pretty similar to last time when I had all the ISO problems i.e. overcast and pretty gloomy. With my new found confidence I was shooting in mostly manual mode so I did a lot of experimenting with various settings to get a feel of what effect these would have on the images. What I noticed above anything else was that anything above ISO 100 was hopelessly grainy. Now my question is this- what I understand from your good selves and the Beginners Guides that I have been referring to is that upping the ISO is a way to get a better image in low light conditions so is ‘low light conditions’ actually code for darkness or indoors? Should I be using ISO 100 outdoors no matter how cloudy, gloomy and overcast it may be? One particular guide recommended using ISO 400 as standard- stuff that if these results are anything to go by.
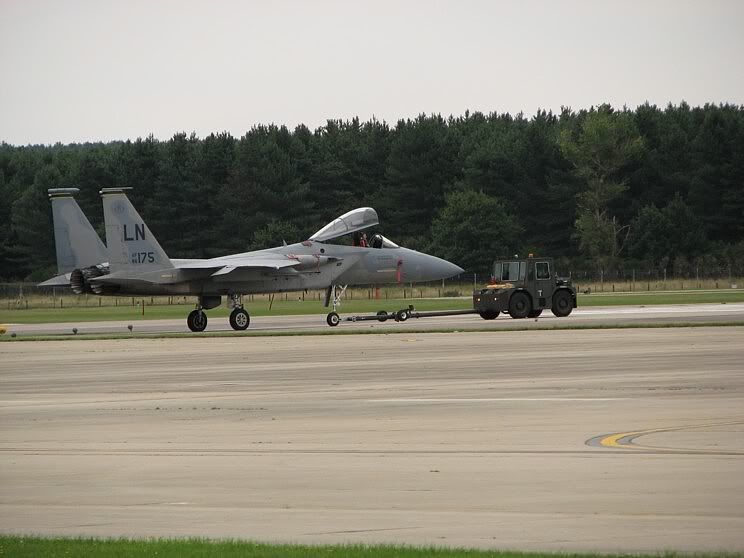
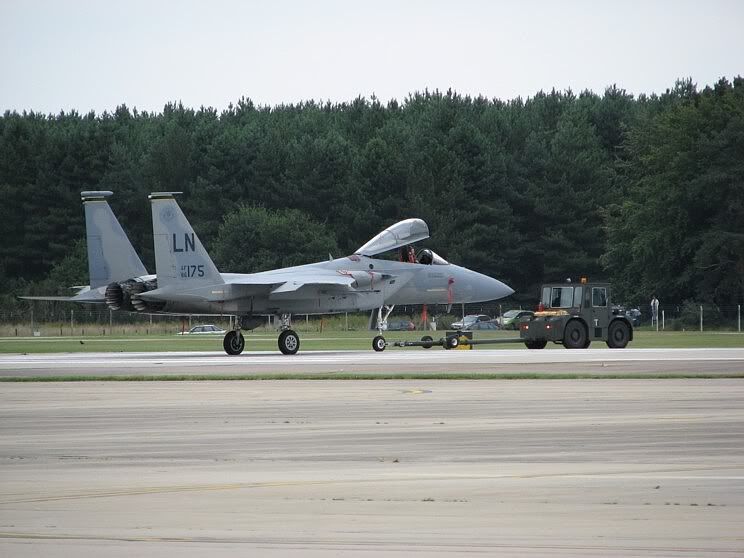
Second question- take these two shots (below). I made all the decisions for the first one and then set the camera to auto to see what choices it would make and took virtually the same shot. Interestingly the camera used the same shutter speed and aperture value I had chosen (but looks like it might have upped the ISO). Please ignore the composition and background clutter for now as I am interested in comments on the comparative image quality of the two (they are both unmessed with- apart from the resizing- and uncropped) the first one seems to be a bit too dull but the second seems to have the colours slightly too washed out. At least to my beginners eyes. If I wanted to keep this image would the best course of action be to brighten up the first without losing the contrast or tone the second one down?
*Edit-both these look terrible compared to the originals…is this an effect of the resizing?*

By: Phixer - 3rd September 2007 at 22:00
On the issues of improving the gamma of certain areas of an image and of carrying out sharpening last and taking due care to not irreversibly degrading the only copy, the original, of an image I wonder if shooting RAW and using processing software such as Lightroom may help as a head start.
Lightroom, like other software of its ilk and I use this program having invested in Pixmantec’s Rawshooter which Adobe bought up, alters images during editing by using metadata files containing a record of any changes worked. The only time the changes are irretrievably applied is at the point of export as JPEG or TIFF and these changes are only applied to the exported image and not the original which is preserved so that a very different looking image could be created if one so chooses but once again without irreversibly altering the original.
Lightroom has many subtle controls for revealing detail in shadows, and with digital it is a common axiom to underexpose by a half stop or so. BTW this is easily fed in quickly with the dial control on the left of a Dynax 7, 7D, both of these cameras have an equally useful flash compensation dial immediately below on the same spindle, the Sony Alpha 100 is not quite so convenient here as I think is true of other digital SLRs well worth exploring this.
If highlights are blown then Lightroom has the ability to reclaim some detail here if not too severe, plus many other useful gamma and colour adjustment capabilities.
I apologize to those familiar with such software and also to those who may prefer an alternative.
I cannot stretch to Photoshop CS, why do Adobe have to make it so darned expensive not everybody can quickly recoup the cost of this, but the Lightroom and Elements route suffices for me. To be sure some times I miss the use of masks but a surprising amount can be done with elements when required, Elements 1 at that as I dislike the resource hogging extras with later versions which intercept any memory device and thus interfere with import of other data types.
My new laptop became almost unusable when I put a later Elements on it last year, with a dual core processor and 2GB RAM, and after finding a helpful O’Reilly page which informed on how to circumvent some of Elements resource intrusions I finally gave in, uninstalled Elements and finding this did not cure all issues re-installed XP Pro. Fortunately I had purchased a self install version of XP Pro and it was early days with this computer.
By: RobAnt - 3rd September 2007 at 18:51
It’s a matter of personal preference, really.
The second one is colder, but brings up a little more detail on the ‘plane, but is a little blown out in the sky and on top of the aircraft fuselarge.
The first one is warmer, but isn’t blown out anywhere, at the expense of a little detail.
Whichever is what you saw with your eyes would be more technically correct, in terms of the warm/cold hues, I suppose.
You could try this; take the first one, and using the colour balance tools I lowered the pictures “temperature” to 7400 and removed any colour cast. After a little bit of sharpening I managed to get a little closer to the second photo without blowing out the contrast in the sky and wings/fuselarge.
I use Paintshop Pro, incidentally – I don’t know what tool you use to edit your photos, but there would be similar tools in Photoshop.
By: tache3 - 3rd September 2007 at 11:12
Thanks for the advice Rob. I have reloaded the above images after a slight sharpening, they are definitely better but still not as good as the original. Do you agree with Bob about the comparison between the two by the way?
By: RobAnt - 2nd September 2007 at 15:21
Or is it an unfortunate by-product of the resizing procedure?
That would be my experience. I usually make a couple of different sizes for use on my website (744×446) and my monitor (1280×768) and the monitor copy always need to be sharpened when brought down from the original dimensions, and then again when brought down to 744..
I usually add some sharpening on the picture as a whole, just to counteract that effect. Be careful though, if you go overboard using the “unsharp mask” tool you will also change the contrast levels.
You can always play around with a second copy of the original, simply use the copy tool in XP (or whatever OS you use) and paste it into another directory to avoid accidentally deleting or modifying the original. Sorry if that sounds like teaching you to suck eggs, but you’d be surprised how many people learn to improve their skills, but then can’t do anything about older images, because they’ve been changed.
CS2 is a version of Adobe Photoshop. it is now available as CS3. There are loads of reviews, simply do a search using Google or something.
By: tache3 - 2nd September 2007 at 01:10
Hi Bob,
Thanks for replying and thanks for the advice. I suspected the first shot would be the best choice so its nice to know that my fledgeling instincts were right!
Regarding the sharpening, the original images are way sharper than these reductions. Is that just a result of using the cheapo free software that came with the camera? Or is it an unfortunate by-product of the resizing procedure?
> If you have CS2 or above you can also play around with Adjusting Shadows/Highlights<
What’s CS2…?
By: mantog - 1st September 2007 at 12:01
Hi Tache
I’m certainly no expert, still on a learning curve myself but I’d say you have more chance with the first pic. It seems to me that in Auto mode on pic 2 the camera has boosted ISO because it recognized much of the scene was fairly dark. However, this has slightly overexposed (I think) the top of the wing, and ‘blown’ the sky. It’s a lot easier to recover details from an underexposed area than overexposed.
Pic 2 seems to have the better white balance but you can change the temperature in shot one, especially if it was shot in RAW.
If you have CS2 or above you can also play around with Adjusting Shadows/Highlights. Create a new layer, make a rough selection that includes everything but the sky and paste it into the new layer.That way any attempts to recover detail from the slightly dark areas won’t cause the sky to overexpose.
Finally, some very delicate sharpening would help bring the picture alive. The way I sharpen in Photoshop (always leave this until last) is to create a duplicate background layer, change the layer style to Overlay then go filter > other > high pass. When you change the sharpening level using the slider you should see a preview – I usually only apply enough so that in the preview pane you can barely make out an outline of the subject. You can then play around with the opacity of this ‘sharpening layer’ to reduce its effect on the background layer underneath it. If you need more sharpening you can simply duplicate the ‘sharpening’ layer.
Hope this helps
Bob


 Sign In
 August 31, 2007 at 10:18 pm