Good day Mates !
Welcome to,
“The Mitchell B-25J WWII Bomber scale project”

I will be making a 16lbs flying weight B-25J Mitchell Bomber thread as my contribution to this site and will very soon be display my everydays & making for all of you to follow & see coming alive and to be finish and complet for the summer season 2011.
My Best Regards goes,
to all of you Mates Buddies B-25 Mitchell WWII bombers Groups Squadrons.

By: Col.Mitchell - 30th April 2011 at 10:57
After,
looking at the RG’s while the Mitchell lay on her back and leg’s up,
I see I forgot to figure one thing ,,,their is no air in the system or not connected yet.
I figure,
that is why I have those large side to side movment from my leg’s and not tight leg’s fit. Soon as I will have the air system in & I am shure this will come to what expected to be … Air pressure will tight everything in there.
Why I have’nt thought of that earlyer … lol ..
By: Col.Mitchell - 29th April 2011 at 11:20
Yesterday,
got the drill bite 5/8 size & rolling and made my holes for to accept the RG’s main unit’s. Not much space to let the drill bite go true in that small space area with out having to change to the Dremel as is was a little smaller & better after the first portion of the holes were done with a regular drill machine so to be straight.
After I have tight them with the srew’s I have notice that some part’s metal connected together move a little side to side trow with out been tight in betwen metal contact. That is the movement of all parts together that as some movement trow and not the srew tight holes area. They are tight in there.
One of my main gear left nacelle side,
as less movement going and is more tight fit when all the way down and lock then the other one.
Is it normal to be moving like that? and side to side trow a little?
I will look again in there and see if all is srew tight and well as the RG”s metal to metal connection unit. Maybe a little ajutment is need it and will see to that …
Did also the front nose gear RG and it when fine.
I only had to enlarge the holes on the RG unit metal plate as
my 5/8 screw’s could’nt go true. After I have enlarge it when fine.
First-time I do RG’s of that quality & type …
By: Col.Mitchell - 27th April 2011 at 11:19
Yesterday,
did attach the ESC on both nacelles so I have them on for the weight issue later …
They are on stdby attach now ,, and will fix that to be fix tight later …


I am also looking to inplant NAV lights and lights system on the Mitchell
and have look in there how open it is to link the lights system cables in there …

Will be done nicely as it is open in the ribes and alittle have to be drill to acces the wings route.
By: Col.Mitchell - 26th April 2011 at 12:18
Yesterday,
when to a friend that as a vertical drill to do my holes in my Wheel’s
so to accept the wheel’s shaft in there. All when better then i thought
and got a 3/16 drill bite to do the job properly.
The fit was tight with the shaft and that is what i was looking for at first
not over do it the drill holes and make it over size. Then when I got home
I got my hand drill motor machine and drill again straight to enlarge the holes
with the same drill bite of 3/16. Did a fiew pass in there till my shaft were somekind perfect as to fit.
If I would have take the next biger drill bite,, it would have done a over size hole and did instead use the same drill bite to be safer. Glade I did …
In the coming day’s,
working on my RG’s fit’s and inplant with wood srew’s 5/8 size.
Now,
I have spoke with a B-25J Mitchell owner lately.
We exchange information’s and he as done a making on his bomber that
i will be following the same route …
The lipo’s powerplant batt’s will be re-located right behind the canopy as
this guy as done. It gives the Mitchell a free weight dead issues fix. The
bomber that way balance perfectly. As befort location will balance a little tail heavy for most user …
The regular location on the lipo’s for the Mitchell are inside center top wings
join in for most user,,, I prefert the behind the canopy location for it easyest access and I wont have to flip over the Mitchell everytime I need to get
to my powerplant lipo’s that way …
It flies superbly with that way with to re-locate the lipo’s powerplant.
I am very happy of that solution and will go foward on that idea.
And more,
I will also now cause of the re-location of the lipo’s powerplant,
do a bomb bay doors system where the lipo’s were suppose to be inplant
and will make these bomb bay door’s work with maybe a fiew bomb in there to drop off while going for bombing mission attack’s run’s …
By: Col.Mitchell - 23rd April 2011 at 12:49
How was your day yesterday?
After a fiew weeks of bad and cold rainy weather here mix with
snow and ice we finaly had a decent day with sun and warm temp.
This week was to expect a buddy to visite from USA and had got
together the Mitchell for that meet and so my buddy could see it all together.
Some change as happen with the schedule meet visite & will be done by next week.
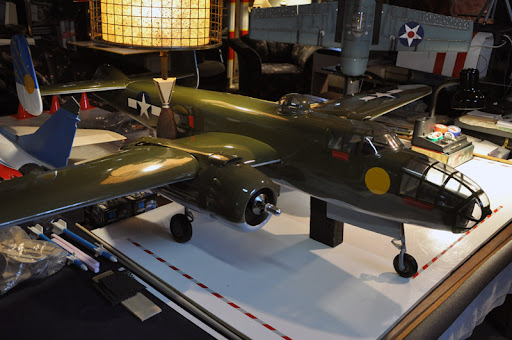
As it was so nice out yesterday at noon hour that I got the Mitchell outside befort putting it a part again to continue the build process by the following day’s …
Here is the first outside sortie of the Mitchell B-25J photographies at the sun yesterday and I most say ,, it as gave me a great amount of goose bump all over and all afternoon while I was making a photoshoot session for the pleasure it provide me …
The B-25J Mitchell Bomber at first site.
A real chocolate pleasure I admite … Enjoy as I did !


While making the photoshooting session,
got a idea while I will do my RG’s , it will be to inplant a extra air cylinder
for to make the front nose RG door bay open and close fonction.
Later in the fall and winter will continue and do my closing
door’s for the main RG’s to work too …
By: Col.Mitchell - 18th April 2011 at 18:06
Updated
photographies to where the Mitchell stand at the moment.
Will continued the process soon after my buddy visiting from USA.
I want him to see it full assemble …
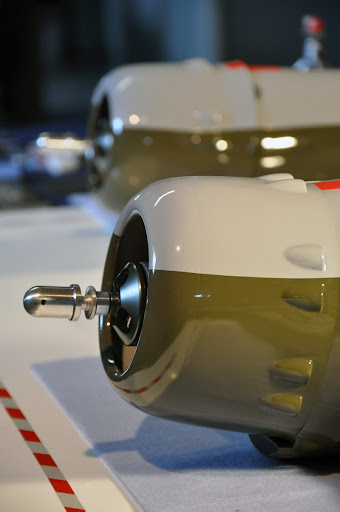
Here is a devise that works great to test your RG”s retracting fonction:

On dorsal to see the standby fix RG’s in for the visite propose:

The ENG’s spiner nut’s I have been waiting for 3 months:

Tail gunner location:

The nose steering wheel RG’s:

The Mitchell on static:
By: Col.Mitchell - 14th April 2011 at 11:52
Yesterday,
got going on the nose gear door bay.
I have the one from the kit it self, but will put that good one
on the side to be use later as I will do maybe next fall or winter
my retractable closing doors and will need that one in one piece.
So made a other door for the front nose gear and will make the hole
so that the gear and strut get’s in smoothly. I have sand the wood balsa block
so it can acheive the proper corner’s curves around the fuse round bottom.
At the moment waiting to receive proper information
to where to drill my 4 holes to holddown the RG’s devises.
Got 2 answers this morning and will read more befort making the
right inplant drilling holes.
Till now, the informations are very accurate and trusty as owners of the
same type Mitchell have done it with succesful result’s …
Will make up my mind and will proceed soon …
NEW making of the front nose gear door plate:


By: Col.Mitchell - 12th April 2011 at 10:56
Yesterday,
got going on the nacelles underbelly RG’s cutting area
where the retract’s struts wheel’s gears will be store while retracting
action will be activated.


All when pretty go and better then I was expecting.
Will do some more ajustment on the already cut area
so that the RG’s get’s in nicely.

Next will drill 4 holes where the bolts & nut’s will be located
in proper position on the rail so the wheels clear greatly the open gears storage bay area.

Reamin to do also is the front nose retractable gear and open storage bay area …
By: Col.Mitchell - 11th April 2011 at 12:25
The Mitchell,
continued on the making of the RG’s today.
Drilling holes all day it will be to attach the gears properly
at there respecting holddown point.
Then will do the under “Belly” nacelles opening to get those gears
struts in the nacelle and make them fully retracted inside.
The last time I was on the Mitchell I had all tape the specific
area to be cut down on the fiberglass and while I was getting
one of the main gears and struts proper position I did see that it
would retract not right and straigh where it would need to be.
So now, I will inplant the gears mechanical devise with the bolts
to hold down and then flip the retracts towards where it need to be cut to have a perfect retracting action all the way in …
All will go fine,,,
just need to take my time and not rushing anything in there.
Will update soon with photographies on the process I had taken …
By: Col.Mitchell - 28th February 2011 at 11:55
The last fiew,
weeks have been kind of busy but back on the routine
with the Mitchell now …
To come,
will be to cut the retractable main gears door’s bay from under
left and right nacelle. I have align the cutting area with tape.
One of the nacelle seem a little off align from carves line already done from the factory. Will see to cut on the right alignment route so the strut get’s in straight into the retract bay area.
Only one seem off ,, so will make shure to cut it where it will do a great job even if I have to be off the already mark carves lines to follow from factory … Little ajustment at time with ARF …
Will take my time and all should fit smoothly …
Yea I will take my time no rush how so ever need to be perfect.
Little by little I’ll cut the door’s so it come to my satisfaction result.
Bay door’s cutting area on nacelles:


By: Col.Mitchell - 12th February 2011 at 10:42
Electric motor Installation,
is what I have acheived yesterday or at lease a start.
I have got the left ENG nacelle on the bench table and apply
over it the appropriate Left ENG mounting template to drill for
the attach motor standoff. Did use a tube in center hole of the
nacelle and template to keep everything straight.
Then I had tape my motor template to the nacelle and ready for drilling
with a 1/16 on 4 location on that template attach unit.


The 4 locations drill holes have been done and will remove the templates
so I can enlarge the hole with a 5/32 drill size to accept later the ENG standoffs.

The ENG standoffs have been bolt to the firewall now and not tight
fite yet. As I have to let them loose a little to attach the motors x-mount
that will be acheived today with the motor attach to it.

Eflite 46 motor with hardware and nacelle with standoffs inplant to firewall.


The x-mount that I will have to drill on the four exterior hole with
a 5/32 drill as next step and mite be continued today.

By: Col.Mitchell - 5th January 2011 at 10:47
Yesterday,
got to finish the process with automative Goop glue on rib’s and join’s on the left ENG (1) nacelle. All look good as both ENG (Left ENG 1 & Right ENG 2 ) nacelles have been complet on the re-enforce process.
Been putting together the ENG 1 & ENG 2 nacelles for a test try on the wings.
Did inplant and not glue yet the 2 dowell’s in the wing edges to hold down the front of the nacelles to the wings.

Both nacelles & wings join together like a breaze …

Here is one of the retractable main gear with the scale strut by Robart RG air system. Will be looking at the operating doors soon.

Front Nose retractable gear and door bay area soon to be done also with operating door.

ENG nacelle with bottom wing attach.

Powerplant Battery tray wood devise where the Lipo’s batteries will later be hold down & attach during flight.

Underbelly fuse cover that close & secure the batteries tray lipo’s storage bay area.

Nose gear with door and Robart scale strut.

By: Col.Mitchell - 4th January 2011 at 11:19
As plan,
I have started the Automative Goop glue on the right ENG (2) nacelle.
Did finish the process to glue the woody rib’s and join’s via the fiberglass nacelle structure.

All look good and only one section as not been glue bond in there on nacelle right ENG (2). The retractable gear block section area will wait till I make new gear attachement block to make those RG sytem tight point more secure for operation.

Today,
will do the same process with automative Goop glue on rib’s and join’s on the left ENG (1) nacelle.

By: Col.Mitchell - 3rd January 2011 at 11:42
Well Mates,
the fuselage with Lepage application on rib’s and join’s as been final complet yesterday afternoon.
It was a long ron on that process, but it look very secure now and well done.
Mitchell Fuse
with Lepage rib’s & join’s application complet now:

Next is to secure,
with automative Goop glue all rib’s and join’s in there in the nacelles as well.
As it is wood & fiberglass in there this product is best for a strong bond.

Now,
about the powerplant system use. I have spoke to my mentor in scale making yesterday. We spoke about all options as I wanted to be shure with him for my best route with the Mitchell.

I will probably go with the Mitchell powerplant set-up that they sale with the B-25 from Horizon.
As it fly great and no major issues with those set-up and fly well and scale too with them on. Not any good reason to go any other way or route as it as made is proof in reliability and performance from the past.
Will be using a 3 blades prop’s for each electric motor’s engin’s with that powerplant set-up from Horizon
Should be doing my order purchase by this week …
Well here is what my scale master mentor buddy had to say about the 3 blader prop’s for the Mitchell that I want to use.
For the 3 blades in black the Master Airscrew are good.
You would need a 13x6x3 but they dont seem to have electric props in that size.
You might have to go 12x6x3 if using a glow version prop.
Lots of flyers just use the Glow version as they are light props.
13x6x3
http://www.greathobbies.com/productinfo/?prod_id=MAS1360T
12x6x3
http://www.greathobbies.com/productinfo/?prod_id=MAS1260T
Now,
back to the engin’s nacelles glue rib’s & join’s bond on the Mitchell …
By: Col.Mitchell - 31st December 2010 at 11:45
Thanks hindenburg,
Now,
Time to have a look & choose my electric powerplant engin’s motors!
The BL46 outrunner electric motor,
are the engin’s that as been test & design for this model and are sold with the Mitchell if you wish to go electric powerplant. I will follow the same route as many did and have choose the BL46 for is reliability and quality that I am looking for in a twin aircraft like this one.
I have not decide what will be the ESC I will get yet. The 60A ESC is the one they sale with the 46BL but I mite just go for the 80A just to be shure and it depend on the Lipo’s batteries I will get to power that beast bomber. Will have a talk with my scale mentor Mate buddy by this week-end and will have the answer to that by next week and will then purchase order the best ESC and Lipo’s for it.
But the Lipo’s mite come later on the purchase order …
I have not made up my mind on what brand Lipo’s & size will be choosing.
Yesterday,
Did finish the front nose retractable gear bay door area section with Lepage glue and apply with a brush and the servo bay are located right behind the RG bay door area and as been done also.
All rib’s and join’s have been done and did apply small amount of Lepage glue in there just to be secure and with the brush it makes it easy to have a clean application to all specific area zone.

I will have to see about the nose gear attachment section. As I did read on many thread build that it would be good to re-enforce some parts in there as it seem weak at time from the factory and not anought secure holddown blocks in there for the retract’s to be well secure.
Again will have to see what will be add in there to make it more secure for the nose gear befort inplant the retractable gear in a soon future.

The fuse with Lepage glue application on rib’s and join’s continue !
By: hindenburg - 30th December 2010 at 11:48
Nice Work C.M. !!!!!!!!!!!!
By: Col.Mitchell - 30th December 2010 at 10:35
Did some more
on the fuse yesterday.
The nose front section (RX batts) as been re-enforce with the application
of Lepage white glue around rib’s and join’s.

Then next was to do the front retractable gear bay area. Befort going in
I wanted to test the nose gear in to see the proper fitting location. As I don’t
want to apply glue over area where I will inplant the retract’s holddown point metal plates of the devise.

Was going to start to apply the Lepage glue and what do you expect,
Holidays famely visitor’s showed-up at my door for a day visite.
What do expect in the xmas holidays season,, Visitors what else … ;D
Today will do some more work in there …
By: Col.Mitchell - 29th December 2010 at 10:36
The process,
with Lepage glue application with rib’s & join’s continued.
The under front fuse nose gear bay door hatch as been open to acces
the nose section as to apply the Lepage glue application in there …
B-25J Mitchell,
nose gear bay door hatch opening:

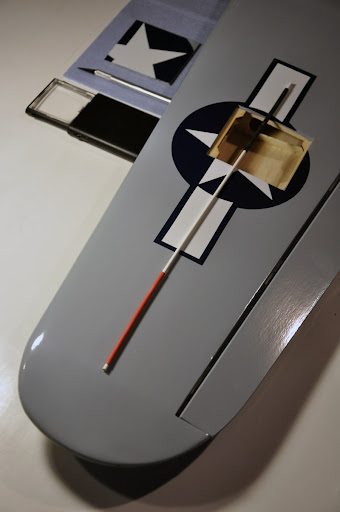
Did Mark with arrow’s
the servo section door hatch direction:

Opening up,
the nose gear hatch bay door:

Both hatch door’s bay section from the front nose fuse
have been open now.

By: Col.Mitchell - 25th December 2010 at 10:46
Work to,
re-enforce rib’s and join’s in the fuse is still on the go …
While glue cure,
took the time to see what will come ahead soon on the nacelles issue.
Got to test the amazing Robart scale main retractable gears with those superb strut’s in their proper location.


Also,
Here is a outlook of a color scheme that I would really like on my B-25J Mitchell to come up with in a near future if I ever go for such idea. At the moment it still to early, but that one color scheme and that idea shure keep’s coming back in my mind … Maybe by next year … Will see …

By: Col.Mitchell - 24th December 2010 at 10:42
Good day benyboy !
Well to answer your question,
I do more then the factory deliver on the attach glue point rid’s and join’s.
I do add very small portion of (Automative contact adhesive and sealant) glue
or silicone and to make shure all as been very well glue on and in betwen the rib’s & join’s attach point. With a
brush it is very easy to make it smooth and clean with out adding to much glue on the model.
I have’nt made or add any other rib’s or balsa join’s in there, all you see comes from the factory final result’s in that matter …
I will also use as a other glue type in some area’s,
The Lepage white glue as it will do great on wood to wood join’s.
Better be safe now then sorry later …


 Sign In
 December 21, 2010 at 12:51 pm