Yesterday,
when to a friend that as a vertical drill to do my holes in my Wheel’s
so to accept the wheel’s shaft in there. All when better then i thought
and got a 3/16 drill bite to do the job properly.
The fit was tight with the shaft and that is what i was looking for at first
not over do it the drill holes and make it over size. Then when I got home
I got my hand drill motor machine and drill again straight to enlarge the holes
with the same drill bite of 3/16. Did a fiew pass in there till my shaft were somekind perfect as to fit.
If I would have take the next biger drill bite,, it would have done a over size hole and did instead use the same drill bite to be safer. Glade I did …
In the coming day’s,
working on my RG’s fit’s and inplant with wood srew’s 5/8 size.
Now,
I have spoke with a B-25J Mitchell owner lately.
We exchange information’s and he as done a making on his bomber that
i will be following the same route …
The lipo’s powerplant batt’s will be re-located right behind the canopy as
this guy as done. It gives the Mitchell a free weight dead issues fix. The
bomber that way balance perfectly. As befort location will balance a little tail heavy for most user …
The regular location on the lipo’s for the Mitchell are inside center top wings
join in for most user,,, I prefert the behind the canopy location for it easyest access and I wont have to flip over the Mitchell everytime I need to get
to my powerplant lipo’s that way …
It flies superbly with that way with to re-locate the lipo’s powerplant.
I am very happy of that solution and will go foward on that idea.
And more,
I will also now cause of the re-location of the lipo’s powerplant,
do a bomb bay doors system where the lipo’s were suppose to be inplant
and will make these bomb bay door’s work with maybe a fiew bomb in there to drop off while going for bombing mission attack’s run’s …
How was your day yesterday?
After a fiew weeks of bad and cold rainy weather here mix with
snow and ice we finaly had a decent day with sun and warm temp.
This week was to expect a buddy to visite from USA and had got
together the Mitchell for that meet and so my buddy could see it all together.
Some change as happen with the schedule meet visite & will be done by next week.
As it was so nice out yesterday at noon hour that I got the Mitchell outside befort putting it a part again to continue the build process by the following day’s …
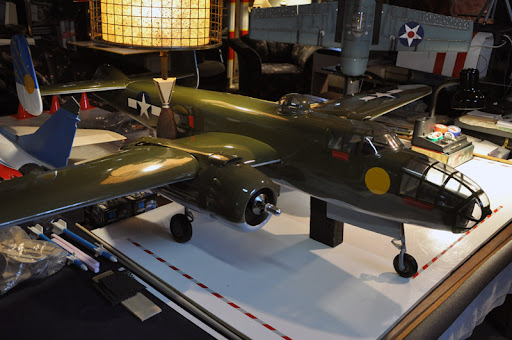
Here is the first outside sortie of the Mitchell B-25J photographies at the sun yesterday and I most say ,, it as gave me a great amount of goose bump all over and all afternoon while I was making a photoshoot session for the pleasure it provide me …
The B-25J Mitchell Bomber at first site.
A real chocolate pleasure I admite … Enjoy as I did !


While making the photoshooting session,
got a idea while I will do my RG’s , it will be to inplant a extra air cylinder
for to make the front nose RG door bay open and close fonction.
Later in the fall and winter will continue and do my closing
door’s for the main RG’s to work too …
Updated
photographies to where the Mitchell stand at the moment.
Will continued the process soon after my buddy visiting from USA.
I want him to see it full assemble …
Here is a devise that works great to test your RG”s retracting fonction:

On dorsal to see the standby fix RG’s in for the visite propose:

The ENG’s spiner nut’s I have been waiting for 3 months:

Tail gunner location:

The nose steering wheel RG’s:

The Mitchell on static:
Yesterday,
got going on the nose gear door bay.
I have the one from the kit it self, but will put that good one
on the side to be use later as I will do maybe next fall or winter
my retractable closing doors and will need that one in one piece.
So made a other door for the front nose gear and will make the hole
so that the gear and strut get’s in smoothly. I have sand the wood balsa block
so it can acheive the proper corner’s curves around the fuse round bottom.
At the moment waiting to receive proper information
to where to drill my 4 holes to holddown the RG’s devises.
Got 2 answers this morning and will read more befort making the
right inplant drilling holes.
Till now, the informations are very accurate and trusty as owners of the
same type Mitchell have done it with succesful result’s …
Will make up my mind and will proceed soon …
NEW making of the front nose gear door plate:


Yeah,
I did understand your ways of saying …
Just wanted to comments more for the newbies
that would be interested in such machine. I don’t
want anyone to be expecting such kit to be looking
all that good from the box.
But with some up peak imaginations you should be able
to acheive it greatly …
Thanks for your comments buddy ,, always appreciate your saying
and view here …
Yeah Benyboy,
it is a very nice kit but it does’nt come that way as you see
on my photographies.
The HIROBO kit as less add-on’s then what you see on my LAMA
as I have custom re-design the hole helicopter and choose
to make it as powerplant by a electric ENG motor system that
is not offer with this kit as it is made for a glow ENG and the
customer as the choice to do it in betwen (30-50 size) motor ENG.
I choose to be in with a Scorpion 50 size range powerplant ENG
motor on my and most say it is highly reliable and secure to trust …
To answer your question,
flew on a varieties of Executive fast mover Jets …
Yesterday,
got going on the nacelles underbelly RG’s cutting area
where the retract’s struts wheel’s gears will be store while retracting
action will be activated.


All when pretty go and better then I was expecting.
Will do some more ajustment on the already cut area
so that the RG’s get’s in nicely.

Next will drill 4 holes where the bolts & nut’s will be located
in proper position on the rail so the wheels clear greatly the open gears storage bay area.

Reamin to do also is the front nose retractable gear and open storage bay area …
On the roll,
the LAMA SA-315B SAR CCG is very popular at events or while visiting real buddies helicopters compagny like Canadians Helicopter homebase near my home one of the larger helicopters compagnies in the world …


Next saturday,
will be presenting the LAMA SA-315B SAR CCG at a public event if
the weather permitted as it will be outside a hobby store parking lote.
Should be fun to share with other masters there ….
Will take photographies if weather don’t cancel that event …
The Mitchell,
continued on the making of the RG’s today.
Drilling holes all day it will be to attach the gears properly
at there respecting holddown point.
Then will do the under “Belly” nacelles opening to get those gears
struts in the nacelle and make them fully retracted inside.
The last time I was on the Mitchell I had all tape the specific
area to be cut down on the fiberglass and while I was getting
one of the main gears and struts proper position I did see that it
would retract not right and straigh where it would need to be.
So now, I will inplant the gears mechanical devise with the bolts
to hold down and then flip the retracts towards where it need to be cut to have a perfect retracting action all the way in …
All will go fine,,,
just need to take my time and not rushing anything in there.
Will update soon with photographies on the process I had taken …
Yeah,
I can’t wait also to make up my mind on one … lol …
As I like to design, test, and use my imagination for any
issues, it should come out very stylish and colorful …
Having a great time and fun is what that kept the spirit high.
So it does do the trick for me … 😀
A update,
the dorsal as to done differently after the test been done on the look.
As the canopy glass is kind of small on the side edges it would be to short
to have a tight eachside canopy fit and make it the way i plan have not
pass the final test.
So I decide to use the dorsal extension a different way and over the back
canopy top glass to have a perfect fit. I mite work better that way and will have to make the sand down join flush in betwen the canopy top back glass and the dorsal part. It will work in my book, so more testing are to be schedule
to final that process add-on making …
More to show soon ….
Here is,
some photographies of the LAMA SA-315B SAR CCG
at my homebase facilities while flying in fall season indian summer.


Here,
is the winter photographies front view flying season
at my homebase & on flying field ground.


Thanks guy’s !!
I much appreciate your input in here …
I have’nt got to the store to order yet
some other stuff issues came first …
Later soon …
Thanks for the link for the lights system buddy …
Will have a look at them befort maiing my decision …
I have decided to sand down the hole MIG now, and not to keep the nose colors and dorsal RED,, so I can do the paint job my self soon with out going around those old paint area from the kit maker that came already done with the MIG.
I have’nt choose the colors yet, but I have some idea I will take to term soon.
Will have to do the all primer first and then I will be up for the color schemes I would love best for my MIG.
Thanks all for the interest you show towards my MIG build thread making …
Cheers !!
More of that day …


After landing going towards TARMAC and GATE Parking …


Compagnies B-787 Airliner’s I will fly for this year as Left seatter Captain …
Till I get a Airliner on my working build bench here … ;D


Yesterday,
was windy, rainy & overcast …
As I was over with some pre-flight spring check on the LAMA
I got to the SIM and got a fiew hours flying the B-787 Airliner.
I have created a new Int’l airport and made 2 runway’s and one
to fly right over a hangar end of runway building while on final glide path.

Airliner’s are really something to fly and to handle as scale flying circuit.
I will have to to make one after my 2 present scale projects have been acheived.
So for the time been ,, I got a scheduled check-ride as left seatter Captain with Boeing chief test pilot.
Here is my check ride photographies while been assign test as Captain on the B-787 yesterday afternoon at WACO Int’l airport I have created …


Right on Buddy!
That was a pure pleasure to have found that part to complet
my idea design on that issue with the dorsal. More fitting will come in
the next couple day’s.
Saturday,
did a little work on the dorsal join canopy and test are still at it …
But getting there and very happy of the coming result’s …
As it was a nice cold morning day yesterday,
Got the water out and vacum and got to clean the little Jetta
for her spring clean-up. After the lunch as it was warmer I got
to test if the MIG would fit in the Jetta for transport next to me.

Wonderful news, it fit in there like a glove. Will do soon the hold-down
so it remain tight and staydy while driving to the club.
That is a relief to know it will be a easy going way on the transport with the SMT now … 🙂
More to come on the SMT soon …


 Sign In